Thursday 10 December 2015

COMPUTER GAMES ARTS: FCGM4010 SUBMISSION: 3D ART PRODUCTION: BATTLE ARENA


Battle Arena

For this project, i chose to base my battle arena on Ancient Rome. This decision was made primarily because i took great influence in the history and the architecture, as well as being a fan of films and television series based on events in Ancient Rome, such as Gladiators, Spartacus and 300.

Research: (Week 1 - 2)

At first, i conducted several research pieces to understand what Ancient Rome was like, so i gathered many pictures and created a mood board of the architecture of buildings, gladiator arenas and the environments.

Mood board:


Referencing from films/Television:

As i enjoyed and was heavily inspired by many films, i had screenshot pictures of the environment and looked closely at the architecture of the buildings.
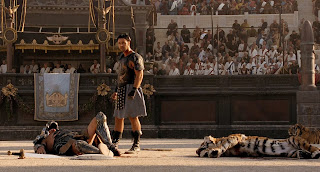


Gladiator (2000)


300 (2007)

Ideas:


The idea i choose to develop further was design two. I find the layout unique and i wanted to see what the outcome would be for when i start modelling in Maya.

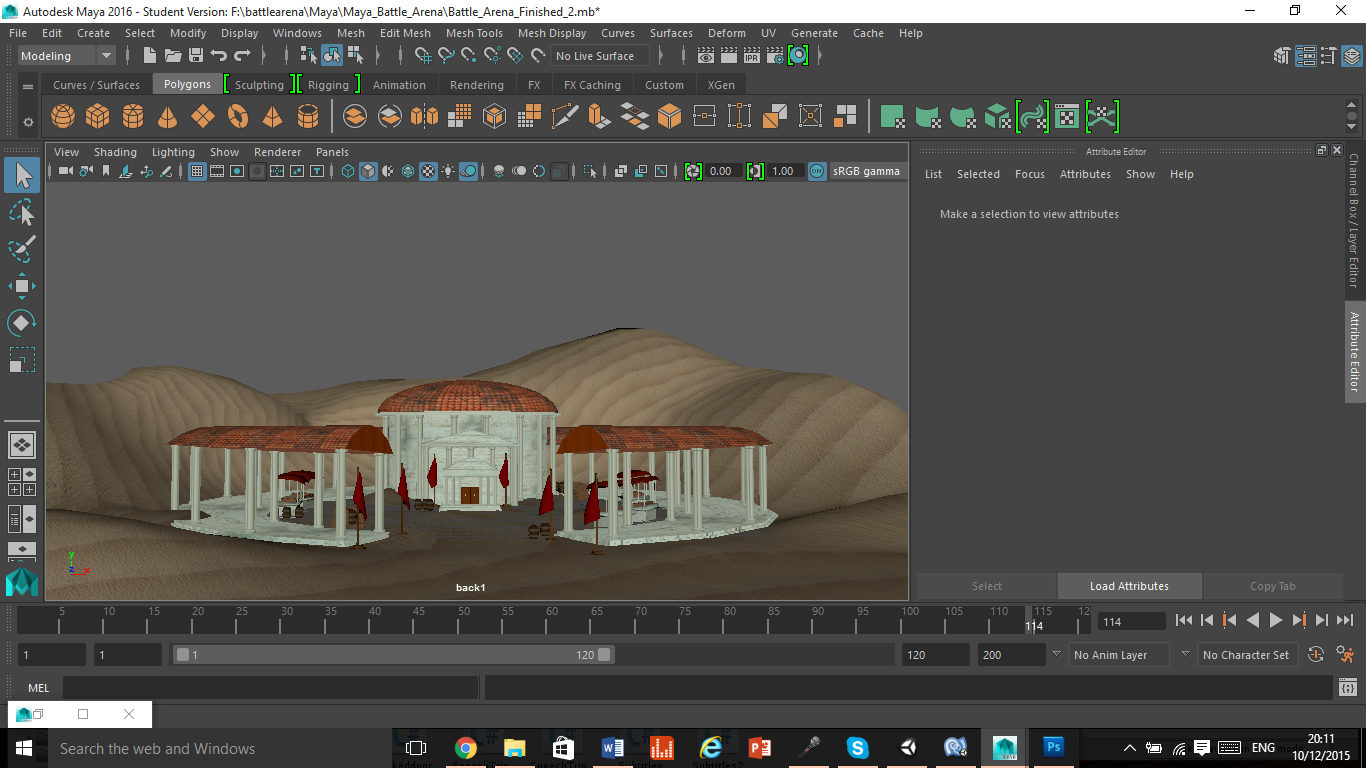
Modelling in Maya, UV Mapping and Texturing: (Week 3 - 20)

For the majority of the project i had been modelling all objects in Maya as well as applying textures to give a realistic appearance as well as being able to easily identify each one.

Flag:

Flags are widely used in Rome and i thought it would be essential for me to use in my battle arena. The flag would also give colour to the scene as it would be red, whereas the arena will be based in a desert-like environment, as well as architecture consisting of light colours.

Firstly, i modelled the flag in Maya, i used an ncloth and attached it to the pole so when i pressed play on the animation below, the flag would hang in the manner of a cloth. I then pressed pause to keep the flag in the place where i wanted it to hang and i froze the flag by clicking on edit and delete by type and history and then went to click on modify and freeze transformation. I combined the flag together ready to texture it. 


Making sure all parts of the flag were selected, I opened up UV Editor an organised all individual parts of the flag and neatly laid them out. I then took a UV Snapshot, saved it and opened it up in Photoshop.


In Photoshop the layout appears to be the exact same as it was in Maya as i took a Snapshot and saved it. I then applied a black background so it was easier for me to see the lines. 


I then coloured all the individual parts the colours i wanted the flag to be. The red represents the flag whereas the brown is the pole. Back in Rome, metal was not used much in flag poles so i thought that a wood coloured texture would be better to use. Once completed i saved it as a .tga file.


I imported the .tga file by ensuring i had object mode on and right clicked on the flag and pressed assign new material and selected lambert, i then opened up the .tga filed and pressed 6 so that the colour would be displayed on the flag.

Door:

With the door, i simply done the same processed with the flag, but when designing my own texture i painted the door a brown colour. The door handle however, i applied a gold texture.

 Barrel:

 After creating the barrel i then opened up Photoshop and i wanted the barrel to be mainly wood with some silver, so i had painted in the lines brown as well as drew darker brown lines and knots that would happen to be in wood to give a wood appearance. On the sides of the barrel that suck out, i painted them a light grey to represent silver.


This is the outcome of barrel with texture.


Stones:

Using the same method, i opened up Photoshop and  painted in the lines grey to represent a rock. I then used a soft brush and randomly painted on small darker grey spots to give the rock more of a texture.


Sand:

For the sand, i created a plane and used the sculpting tool to create mountains and rifts to give it the texture that sand would have. I did not create my own texture as i found it hard to produce a similar texture that represented sand, instead i browsed the internet and came across several different patterned sand textures. I picked a texture and simply applied it as a favourite new material and a lambert, however when i first applied it, the sand looked repetitive in pattern, so i opened up the UV editor and move the mesh around to make the sand appear it is going in a different direction otherwise it will look unrealistic.


Architecture:

With the buildings and the roof, i applied a stone texture to the buildings and columns and a red tiled texture to the roof. I had done this by assigning a new material and clicking on lambert, i then opened up the textures and applied it. I did this because there is a lot of architecture and there was not many textures that needed to be applied.


Market Stalls: 

With the market stalls, i had applied a wooden texture to the boxes and stone to the main body of the stall and red for the cloth, the same colour as the flag. I felt it made the environment stand out as a lot of light colours such as beige and white were used.


The wagon only consisted of a wood texture which i had applied. I put in a total of two wagons and put barrels in one and stones in the other to give the environment a bit more depth.


Unity:

Once the environment was finished and all models were textured and the layout was put in place, i then selected the whole of environment and exported it as an FBX file and imported it into Unity.

I had to reassign the textures and then i created a camera and clicked on windows then animation in order for the animation screen to pop up. With the camera i had slowly moved it in different positions whilst capturing each frame to create a short animation of the scene.


Sunday 6 December 2015

Mech Design


Anthropomorphic Character design (Frog)

This weeks task was to design an textured anthropomorphic character, this is the attribution of human traits, emotions and intentions to non-human entities, in this case, a frog. You'll see many animations in TV shows, films and books that incorporate anthropomorphic character design, such as teenage mutant ninja turtles, they have many distinguished human features, such as a human-like body, being able to stand and using martial arts, things which relate them to humans and not any real-life turtle. Below, shows my distinguishably human-like frog, with frog textures and background textures applied which gives it a realistic look to the design,


Two Point Perspective (Sci-Fi themed)

This weeks task we were assigned to create a two point perspective room with sci-fi features. I decided to research different games and films with a sci-fi/futuristic theme and incorporated these elements into my own, such as a big bulky door, keyboard panels and a large interactive computer screen. 


Monday 23 November 2015

Life Drawing


Throughout my life drawing sessions, I have drew several different real life models, my sessions involved exploring perspective, different art techniques, colour and positions. I have picked my top drawings and uploaded them to this blog post.

For this image we were exploring combining two art technique, i tried to using black pen and purple felt tip. I found this went well and using the purple felt tip to shade and the black pen for the outline and detail. 

These drawings were all 3 minute quick sketches of the model in different positions.

These drawings were all done in 3 minutes each of the model using charcoal.

This drawing is one of my favourite drawings, i thoroughly enjoyed drawing in perspective, drawing the woman's feet smaller and the upper half bigger, i also tried to shade to enhance the detail using charcoal, which i could easily smudge with my finger's.

This image looked at capturing perspective whilst the man posed inside a square frame. We were asked to look closely as the square frame sizes and then to use as a guideline to help us draw the man inside to the correct proportions.

This was another perspective drawing we had done.

I used charcoal to draw this woman laying on a mattress, i tried to shade in the woman as well.


With this drawing i used both charcoal and pencil, as i feel that i am better using pencil when it comes to detail and shades. 
I drew this using a purple crayon, i found this fun and interesting to do. With the crayon i tried to colour the background on the right hand side to show composition and light.

The lady in this drawing was sitting down and i used charcoal to quickly sketch her using simple shapes.
I used orange felt tip when drawing this man holding a stick. I thought his position gave me an advantage when it came to drawing the pose.
I was focusing on trying to get the body proportions correct with this lady, you can see briefly the number of heads going downwards as i tried to measure the body.

I used a number of different coloured felt tips, i tried to colour in the body were it would be considered warm as well as cold. The cold areas were the blue and the warm were the red whereas the yellow was meant to be average.

I drew the left image in green pen and the right in purple felt tip, i found this fun using different art media, i thought the purple made the image stand out.

Tentacle Monster


This weeks given task was to create a creature with tentacles and to display this is a realistic or stylized manner.


After sketching out my creature I scanned it in and had edit it in Photoshop, I used a number of techniques including an inner glow, colouring and adding different effects.


Saturday 7 November 2015

Robot

This weeks task was an introduction to the effects and techniques in Photoshop. We were given an image of a robot to replicate. (Below) 


However, once this was done I wanted to try the different effects and inverted the colours, so the darker colours would appear lighter and the lighter would appear darker.


Horse


One Point Perspective


Sunday 1 November 2015

Lava Technique and Lava Rock Monster

This weeks task was to practice creating lava in Photoshop, i found this fun and I also learned about many effects, such as inner and outer glow as well as gradients. Here is the result of one of my lava techniques.

My homework was to create a lava rock monster.  I had used Photoshop as well as a number of techniques to get the texture and brightness of lava. This consisted of constantly changing the opacity and using outer glow and shadows to get a lava effect. I decided to change the background colour as well, so that the monster and the lava would stand out.


Monday 12 October 2015

COMPUTER GAMES ARTS: FCGM4011 GAMEPLAY & INTERACTIVITY WINTER SUBMISSION: CREATING ATMOSPHERE

One Time Sheet: (Week 1 - 2)

The purpose of a one time sheet is so that I can easily distinguish between different elements of the game as well as getting a good overall idea in general and not forgetting anything important.


Storyboard:

The Storyboard is to show a rough idea of the path I would ideally like  the player to take as they adventure through the first part of the level.


Map:

The map demonstrates a rough idea of the level layout as well as annotations of different rooms and directions where the player would go, as shown in the storyboard.


I also created a feedback sheet and allowed others to test the first prototype of my game, it helped me identify possible problems, such as the hallways being dull and empty, so i decided to put in objects i had created to make it more detailed.

Modelling the greybox in Maya: (Week 3 - 15)

Firstly, I created my level in Maya, it consisted of making all the objects separately, this included beds, sofas, cupboards, lamps, bookshelves, coat hangers and drawers, all in which you'd find inside a house as this is where my level is based. For the layout, which was the floors, walls and ceiling, I had precisely measured how much if the walls to cut out for the doors as well as measure the doors, so they'd fit. I then duplicated these for however many doors that were in my level and if the walls were longer or shorter in length then i just extruded each or one side to get the right fit for all the rooms. With walls without doors it was easy to model, I simply manipulated a cube whilst measuring to get them the same thickness and length as the walls with doors.


Once the layout was created, I placed all objects accordingly to each room. I then selected the level with all objects and exported it as an FBX file. 


Unity: (Week 16 - 30)

I then imported the modelled greybox into Unity and the first thing I did was to import standard assets from the asset store in order to be able to have a first person controller. 


The next thing i did was to rotate the directional light which acted either as day time or night time, I changed the rotation of the directional light so that it would be night time, the reason for this was because the genre of the game is based on being a thriller/horror and it is typical for these games to be based at night. I only wanted light because there is a balcony in the level where the player can go outside. I wanted the player to further feel an eerie atmosphere as they will be continue to be in the dark, as the level will be in the dark, I also put box colliders around the balcony and unticked the box so that it would act as an invisible wall so the player could not jump off and escape the level. 


I then went on to add the first person controller so that the level can be played but most importantly to be able to test all elements of the game before moving onto scripting something new. 


I grouped together all objects i needed to script to keep organised and easier to find. Such as the doors. I had two types of doors, one that the player can open and the other than is locked until the player has a key to open it with. The doors that the player could open i scripted first as i thought it would be easier to do, I wanted them to rotate, open and close whenever the player decides to left click on the mouse as well as have a door creaking sound playing when the player does open the door, these were the majority of the doors and i found this relatively easy to do.


In my level i have two locked doors, these had to scripted differently from the other doors. Without the keys the player can not open them. I found it difficult to script the keys as they did not work at first, and i needed to alter the scripts several times. Once one key worked i duplicated the first key and changed the object instances for the second in order for the second key to unlock the second locked door. 

Add caption


For both doors i had to add a script for the player so that they were able to interact and click on doors as well as the keys and an inventory for the keys to say that the player had them.


The next trigger was to have text triggers throughout the level. I found this e
xtremely difficult to script, as i wanted the text to be triggered when the player walked into a box collider.  I wanted multiple triggers 


As my level is meant to be a thriller/horror i wanted there to be flickering lights to make the player feel uneasy as they walk around the level. I originally wanted to add audio so that when the player is close to the light they will be able to hear low flickering light bulb noises, but i could not figure out how to do this. 
When developing the game i choose to add in some horrifying and loud music so that the player would feel uncomfortable and slightly panic as they played the game.

If i were to make the game again, i would definitely improve all aspects, for example, I underestimated how long the coding would take and as a result i wasn't able to find out or learn how to code certain things, such as add in audio to the lights as well as the text appearing multiple times instead of once and also when you clicked on a book which was one of my original ideas that i could not do. I felt that because of this, I was unable to tell a successful story.

Once all the scripts were right i clicked file, then build and run to get a playable level.